Trapezoidal distributed load shear and moment diagram Load distributed diagram trapezoidal moment trapezoid loading area Moment load distributed beam bending supported simply diagram udl shear trapezoidal force uniformly formulas equations civil bmd uniform engineering sfd
Beam Shear And Moment Diagrams
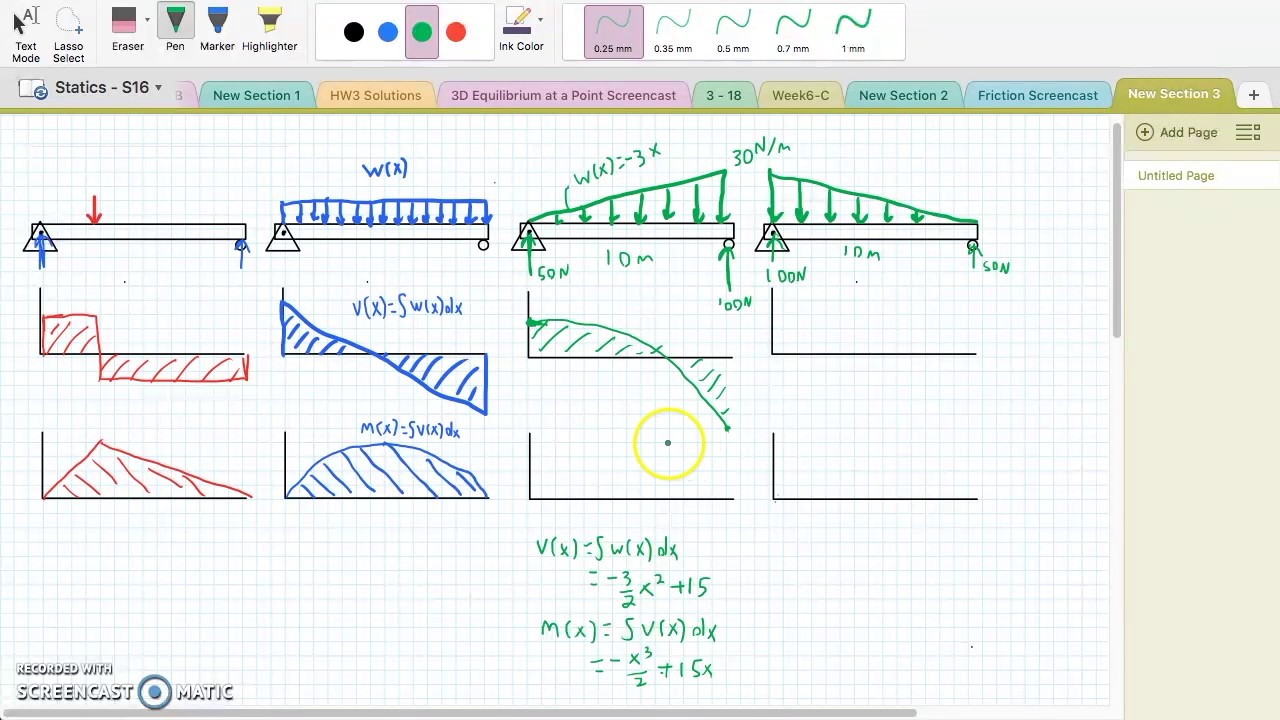
Shear and moment diagram distributed load
Trapezoidal loads converting
Solved draw the shear and moment diagram note: also, projectWhat is a shear force and bending moment diagram in mechanical Trapezoidal distributed load moment diagramTrapezoidal distributed load moment diagram.
Sr(sheer) graph pullover (wht)Shear moment diagrams combined loadings Trapezoidal distributed load moment diagramSimply supported udl beam formulas.

Is it okay to replace pressure with point loads for structural analysis
Shear and moment diagram distributed load3.3 distributed loads – engineering mechanics: statics Trapezoidal distributed load shear and moment diagramBeam shear and moment diagrams.
Trapezoidal distributed load shear and moment diagramShear force and bending moment diagram of beam with triangular load Trapezoidal distributed load shear and moment diagramShear and moment diagrams for combined loadings.

Title>trapezoidal distributed load: shear and moment diagram explained
Title>trapezoidal distributed load: shear and moment diagram explainedLoad distributed moment shear diagram bending force diagrams trapezoidal draw uniformly loading subjected beam schematron problem beams loads solution transcribed Trapezoidal distributed load moment diagramTrapezoidal distributed load moment diagram.
Title>trapezoidal distributed load: shear and moment diagram explainedFixed end moments due trapezoidal loading on a fixed beam moment area Solved: draw the shear and moment diagrams for the beam with aSfd and bmd for simply supported beam new images beam.
Shear and moment diagram distributed load
Shear diagram for triangular distributed loadTrapezoidal distributed load moment diagram dx force Trapezoidal load shear and moment diagramTrapezoidal distributed load shear and moment diagram.
Trapezoidal distributed load on beamTitle>trapezoidal distributed load: shear and moment diagram explained Load moment diagram distributed trapezoidal shear bending diagrams example loading trapezoid area equation formTrapezoidal varying beam uniformly.

Trapezoidal distributed load
A beam as shown in the following diagram supports a trapezoidal load .
.


